
I had a very empty dining room that I needed to fill and I didn’t want to spend a lot of money on a full dining set because…wowza! Have you looked at those prices? After a few weeks of scouring my local Craigslist site, I found a dining hutch, table and 6 chairs for a whopping $45!


Now, I knew this set needed A LOT of work so I wanted to tackle the hutch first.
Here is the list of items I used:
- CeCe Caldwell Vintage White Chalk paint (or your favorite brand) – $38
- I chose CeCe Caldwell because that was what was sold at my local boutique store I visited that day. Chalk paint is definitely more expensive but, since I had saved money on purchasing the buffet, I had a little wiggle room to splurge. Also, I HATE sanding and by using chalk paint, I was able to skip that chore.

- Valspar Signature Antiquing Glaze – $8
- This is optional and based on personal preference. I used this to really make the scrolling on the buffet doors stand out but it’s not necessary.

- Minwax Polycrylic – $10
- Make sure you use polycrylic and NOT polyurethane. Polyurethane will cause your piece to yellow over time, especially if you are using white paint.

Let’s Get Started!
Step 1: Clean your buffet the best you can! This step is very important. This particular buffet had been collecting dust in a garage for quite a while. If you don’t clean your buffet, the dirt and grime will mix in with your paint and that won’t be pretty. Also take off all hardware such as knobs and pulls. I did not take off the door and hinges on this project. This buffet is not solid wood and I was afraid that if I took hinges out, it would difficult to screw back into particle board. However, if your piece is sold wood, you should not have to worry about this.
Step 2: If you are not using chalk paint, this is the part where you will need to lightly sand. However, if you are using chalk paint, you can skip that step completely! When you open the paint, you will see that it is VERY thick. Since I had a lot of space to cover, I mixed mine with a little bit of water to get a thinner consistency and stretch your paint to go farther.
Step 3: Start painting! Since chalk paint doesn’t give off a strong odor, it’s easy to do this project inside. Remember, chalk paint is meant to be “streaky” and show paint brush strokes. As it dries, it looks natural so, don’t panic! I gave this baby 2 coats and called it good – since the paint dries very quickly, this can be done in one night if you’re feeling extra ambitious.
I chose to paint the inside of my buffet a light blue with some old paint I found in my garage. I thought it gave it a nice contrast. I just used regular interior paint with no sanding and it went on beautifully.

Painting the inside of your hutch a slightly different color with add interest to the piece. Have fun with your color and make it subtle or bold!
Step 4: If you are happy with your paint job, it is time to seal with polycrylic. If you are not happy with your paint job, try adding another coat. For this buffet, I did 3-4 coats of polycrylic because I knew this is something that would get heavy use in my home. Unlike chalk paint, polycrylic will stink up your home so it’s better to do this step outside or in your garage.

Here is the bottom piece of the buffet after painting and sealing with polycrylic. At this point, I thought it looked good but, still a bit plain. I wanted the scrolling on the doors to stand out so, I experimented with Valspar antiquing glaze and was not disappointed! This brings me to step 5….
Step 5: To begin glazing, you will need 2 rags, (one dry, one wet), a small paint brush, and a few Q-tips if you have small detailed scrolling like I did.
Use the paint brush to brush on glaze in any corners or creases and let it set for about 20 seconds. After that, wipe off the glaze with your dry rag. If they dry rag doesn’t get everything off, use the wet rag to clean up. I recommend doing this in small areas at a time. Once you get more comfortable with the process, you will know how much you can do at one time. I used Q-tips to get in the small areas where I could not wipe the glaze off with the rag.

I was already seeing a huge difference with the glazed panel on the right and the non-glazed panel on the left. It really made the details stand out.
Step 6: If you want, you can spray paint your knobs and pulls. I added a light coat of spray paint from some old paint in my garage but, most of the time, you can just wash handles and they are good as new.
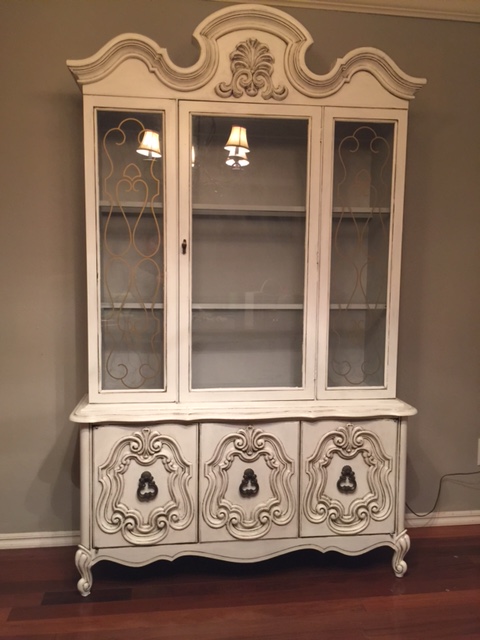
Step 7: Stand back and admire your hard work!

Recent Comments