Dinette Do-Over

Since we have moved into our home, we have done nothing with the dinette. Basically, it’s just the room where we throw our stuff when we get home from work. To make this a more functional space, I decided to give it a bit of a makeover. I wanted this to be a quick project because I’m not quite ready for another big/messy project.

So, here is what I started with:

dinette

Yes, I realize the light fixture is a little weird but, I love it. It makes cool designs on the wall at night 🙂 

I began by painting the chairs blue. I got these chairs from a thrift store for $40 and they’ve been patiently waiting for a makeover since I bought them 8 months ago. First, I primed them, and then followed up with the spray paint.

Next, I bought this cow painting from Kirklands. I’ve been eyeing it for awhile and I think it’s so cute! Plus, I just like cows. Don’t judge me.

5bc251b3-2499-4cb8-b9d4-296e9497ef30

After that, I decided to hang some curtains. I like being able to see my backyard from this window so, I didn’t want to block out the light, I just wanted the windows to look “finished.” Since this is a bay window, finding a curtain rod was pretty tricky. I didn’t want to pay an arm a leg for bay window curtain rods so, I just bought the curve joints and used curtain rods I already had. It took some creativity but, I finally figured it out in the end.

To finish up, I added a table cloth, place mats, and some cute succulents to finish this up!

59c30f8f-e272-4e6c-b604-f0d2c436d9e8

749fecc3-1fad-40f7-b146-d337e3ac47af

Categories: Uncategorized | 7 Comments

Furniture Facelift

Here is my newest project! It is solid wood and has some major character so I was really excited to get started on this piece. It was in pretty rough shape – the old stain was peeling off, the bottom drawer was not actually a drawer and just a drawer face nailed on, and it only had 3 casters, all of which were just the metal frames and no wheels.

Since I was so excited, I forgot to take a good picture so, you’ll have to do with this:

b259c172-c85c-4659-8a3d-92b114847f27

Supplies Needed:

  • Sander
  • Stain (color(s) of you choice)
  • New hardware (optional)
  • New castors (optional)- the castors currently on this dresser were worn out. I didn’t have to order new ones but, I thought the castors were what gave this piece all the character so I went ahead and got some.

Let’s get started!

Step 1: Sand everything! If you don’t have an electric sander, I would recommend one. However, it’s not impossible to sand by hand, it may just take a little extra muscle and a few extra cuss words.

When I was sanding, I found these stamps on the back. I can’t make out the first set of numbers, although they look like  date. The second set of numbers says $442. I guess that means the original price was $442? If you happen to know, please comment below!

5015f9f8-ddb7-4d86-bac1-c59d390ac249

Step 2: After it was all sanded, I saw a HUGE difference! I ordered 4 new casters from Amazon (link below) and put them on the dresser. This step was really easy. Since the dresser had casters previously,the inserts were already installed. However, the casters I ordered came with the inserts as well and they are easy to install. You just drill a hole in the bottom of the dresser leg, hammer in the insert and then the wheels will just snap in.

http://www.amazon.com/Shepherd-Hardware-9347-8-Inch-Medium/dp/B00004YOK0?ie=UTF8&psc=1&redirect=true&ref_=oh_aui_detailpage_o03_s00 

Step 3: Time to stain! Since this piece has great wood, I chose to stain it. I thought it would be a waste to paint something as pretty as this. I wanted to keep this as a classic look but, also add a modern touch so I decided to use two colors of stain to jazz it up. I used Minwax Honey and Classic Grey. I used gray for the dresser frame and the honey for the drawer fronts, top, and sides of dresser.


Step 4: I chose just to remove the faux drawer and make it a shelf. I went Lowe’s and got a pine board and had them cut it to size. I stained the drawer insert with the Classic Gray. However, on the pine, it almost looked blue- but I still liked it! Plus, I know I would be putting blankets on that shelf so it wasn’t a big deal.

Step 5. I finished up by adding some new drawer pulls from Hobby Lobby.

3be4835e-9756-47c0-8281-e7eed22992af

Thanks for reading!

aa23d45c-ab1c-4da1-bad0-7a3a6b570df6


If you liked this post, please subscribe to my blog to receive an email with each post. To subscribe, scroll to the bottom of the page and put in your email. You can also follow me at @diyhomeowner on Instagram.


Categories: Uncategorized | Tags: , , , , , , , , , | 2 Comments

Master Makeover II: Pretty Paint

When it comes to picking paint color, I consult Pinterest, and then I go directly to the store and buy the paint. Yes, it is more responsible and less risky to first buy paint samples and test them out but, when I’m ready to do something, I’m ready to do it now and don’t want to overthink it – at least when it comes to DIY projects…in all other facets of life I’m pretty much a “think-ahead”, “little spontaneity”, “no surprises” kind of gal. So, here was the inspiration:

7caea57c626966c5223da5024162c4ec

Look how bright and cheery!

In my previous blog post, I had scraped the popcorn ceilings and painted them white. Since that is out of the way, I am now just focusing on the walls. As a reminder, below is what my wall color was before. It was a nice color but, very shiny and collected dust. Seriously, I was dusting my walls once a week. Who has time to dust their walls?!

unnamed1

The paint I chose was Sherwin-Williams Copen Blue (eggshell). Usually I just go with whatever paint is the cheapest but, this month Sherwin-Williams was having a sale on their expensive paint so, I decided to upgrade and give it a shot. IT WAS AMAZING AND I’M NEVER GOING BACK. It only took one coat to cover this dark navy(ish) and only took my one gallon. With cheap paint, it probably would have taken two gallons. So really, you can save money by paying more for better paint because you will use less- does that make sense?

First, do all your cutting in. Ceiling, corners, and around doors and windows. If you don’t have an edging tool, stop everything you’re doing and buy one of these- Shur-Line Pro Paint Edger. It will change your life. It only costs about $5 and eliminates all need for painting tape. In addition, it only takes me about 30 minutes to edge a room instead of an hour.

Shur-Line 6.8 in. x 3 in. Pro Paint Edger

Get this now!!

After, my edging was done, I used a roller to cover the rest. Once the room was all painted, I decided my ceiling fan did not fit in. I didn’t have a lot of confidence with taking my fan completely down (wires? electricity? No thank you) and I did not want to spray paint it because there are small holes/gaps in the fan and I thought it might ruin it. Instead, I just spray painted the fan blades white and replaced the bulbs.

426b535b-970c-4d0a-b1fc-3ae140dcf47a

BEFORE: fan blades – yuck

ebc7c74d-9820-4bb0-a5f8-a91655f07fd5

BEFORE: frosted bulbs

e875edb4-ccd3-4561-83f9-5a61cc266cff

AFTER- painted fan blades + new bulbs = easy update

161f4d00-6e70-4e17-b7db-6b71bcdb3f24

Top image: wall color before — Bottom image: wall color after

a35c2c3b-cf80-4741-b8af-1018cabe4c6a

FINISHED ROOM!!


Categories: Uncategorized | Tags: , , , , | Leave a comment

Master Makeover I: Scraping the Popcorn

So, yes, our house has popcorn ceilings. At night, as I fall asleep, I see the dust that has collected on the ceiling and the poor paint job the previous owners did before me. In their defense, it is impossible to get a straight line where the ceiling and wall come together with an uneven ceiling. For almost 7 months, 191 days, this is what I see every night before going to bed. I’m going crazy. Something had to be done! In Part I of this makeover, I’m going to talk about scraping popcorn ceilings and move on from there. So, if you don’t get worked up over a ceiling like I do, don’t worry, there is more to come.

Supplies Needed:

  • Ladder
  • Paint scraper- The one I used was 8″. This was long enough to cover a decent size surface area and small enough I could maintain control (it takes a lot of muscle)
  • Roll-on Texture- This comes in two varieties, sand and popcorn. Make sure you get sand! I don’t know what popcorn looks like but it doesn’t sound pretty.
  • Ceiling Paint
  • Drop cloths
  • Paint roller
  • Paint roller extender- unless you are super tall and can reach the ceiling without one

Step 1: Make sure there is not asbestos in your popcorn ceiling. If your house was built before 1978, it is likely that it contains asbestos. If your ceiling does contain asbestos, you will need to have this removed by a professional.

Step 2: Prep the space. Move out most of your furniture (I only left the bed) and cover the room with drop cloths. Remove your ceiling fan blades; they will only get in the way. Also, I planned on repainting the walls so I did not cover them. If you are SUPER careful, maybe you can do it without repainting the walls but, it will be tough. I did like the color of my walls but, it was sort of “cave-like” and I wanted to go something “bright and cheery.”

Step 3: Starting with a small area, spray the area with your garden sprayer. Don’t be shy- really get it wet. The more you spray, the easier it will come off. Also, by spraying your ceiling, less dust will be in the air.

unnamed4

Putting my husband to work with the sprayer!

Step 4: Start scraping! This is a lot of work but is instantly rewarding as you see the ugly popcorn come off. To complete my bedroom, it look approximately 2 1/2 hours.

Step 5: Once you have the ceiling all scraped, it is time to texture. If you had your heart set on a perfectly smooth ceiling – get over it. You will never get it completely smooth. Plus, the texture gives the ceiling some visual interest and hides and mistakes. The Roll-on Texture is like really thick paint. I did not roll texture onto the entire ceiling; only the places where I felt like it needed it.

Step 7: Take a flathead screwdriver to the crease where the wall meets the ceiling. You don’t want an edge of popcorn around the perimeter and this will ensure you get a nice clean line when you paint.

unnamed7

Step 6: Last step! Paint the ceiling with the ceiling paint. This will smooth any popcorn pieces that may be hanging down and give your ceiling a finished look. Now I can sleep happy!

unnamed8

Finished product!

Coming soon: Master Makeover II: Painting and Final Reveal

Categories: Uncategorized | Leave a comment

Tanker Desk Transformation

So, I’ve been looking for a desk to makeover for awhile. This desk will go in the spare bedroom/office. Basically, I just need a place to store important papers that apparently come with becoming an adult. I found this lovely tanker desk (Pinterest taught me that’s what it’s called) on Craigslist for $30. I loved it for two reasons: 1) This is the desk that everyone of your elementary school teachers had. It takes me back. 2) I think taking metal things and making them look “homey” is really cool.

desk1

As you can see, someone already gave this desk a makeover of their own. However, I’m not really a “pink” kind of girl and it needed to go.

Let’s get started! You’ll need:

  1. Can of spray paint, color of your choice. I chose Valspar Metallic Gold ($7)
  2. Wood filler or melamine edging (I’ll explain later) ($0- I already had this)
  3. Paint color of your choice. I used Valspar Furniture Paint in white ($20- I have extra and will use it again)

Step 1: I started off by painting the detail of the desk that I wanted to be spray painted in the metallic gold. For the top drawer, I had to get creative and cover the inside of the drawer of paper so I didn’t get it inside of the drawer. Keep in mind, though, that you’ll be painting everything else in so if you get a little messy with the gold, you can cover it up later.

Step 2: The edge of the veneer was peeling off this desk so I helped it a little and took it all off. It peeled right off. I thought I could buy melamine edging, which just irons on to create a nice edge but, my local Home Depot didn’t carry the width I needed. This probably would have been a better option but, I’m impatient and don’t like stores so, I improvised.

Since the top of the desk is made of particle board, the edge is not nice and smooth. It’s pretty porous and if you paint right of top of it, it might look silly. To fix this, I used my finger to spread a thin layer of wood filler around the edge. This is paintable and filled all the holes. Viola-problem solved! After it dried, I sanded it down and had a nice edge that was ready to paint.

Step 3: Since this was already painted with chalk paint, I went ahead and painted right over it. However, make sure you give the top a good sanding. Looking back, I probably should have primed it. It took me four coats to get full coverage and eliminate that baby nursery pink.

I have not used Valspar Furniture Paint before but, it was quite a bit cheaper than chalk paint so I thought I’d give it a shot. Although I had to do several coats, I would probably use this again. To be fair, I was painting on metal covered with chalk paint which probably isn’t the easiest medium to tackle. I think I’m going to give it another shot on some wood furniture soon. I got this at my local Lowes and there are a lot of color options to choose from that can be mixed for you.

*Note: I thought about just replacing the whole top. I thought a nice stained wood top would look really cool. In the end, I decided to keep my costs down and keep the existing top.

desk9

Step 4: Paint the hardware. I planned on getting new hardware but, there drawer pulls were much longer than your standard pulls. Therefore, the choices in that size were quite dismal so I decided to stick with what I had and give them a face-lift.

desk6

Step 5: Get on the phone and call some friends. Friends that are strong. This desk is HEAVY! Pro-tip: don’t put the drawers back in until after you move it. Also, I had to take the legs off to fit it through the door. Since I don’t believe in measuring if things fit through doors, it was a nice surprise when we had already carried up the stairs. Maybe I should start believing in it? All in all, it was a pretty easy project and just required a quick “spruce.” It looks great in the bedroom/office!


Categories: Uncategorized | 2 Comments

Antiqued Dresser

While walking through my favorite furniture junk store (yes, I’m a frequent visitor), I spotted this ugly blue dresser that definitely had potential. I took this lovely home with me for $25 and went to work! Since using antiquing glaze on some past projects (see my buffet blog post!), it was a lot of fun I wanted to put it to some more use.

dresser4

Here are the supplies I used:

White Paint (FREE)- The previous owners of my house left a ton of paint in my garage so I’m clearing some shelf space and using it up

Valspar Antiquing Glaze ($10)– I have used this on several projects and still have half the tub left.

dresser13

New drawer pulls ($8)- I could have bought more wood pulls to match the existing ones but, I wanted to fancy it up! I found these glass (plastic?) pulls on Amazon for $8 and felt it was worth it. I was pretty skeptical of the cheap price but, they were actually really nice! The biggest downfall was that the screws they included, were too long. Luckily, I had some shorter screws in the garage and it was an easy fix. I will definitely be ordering these again for future projects.

http://www.amazon.com/gp/product/B00JB5ZPVO?psc=1&redirect=true&ref_=oh_aui_detailpage_o02_s00

412dMWACQ6L

Wood planks ($4)- I found these wood pieces at the Habitat for Humanity ReStore. If you haven’t already heard of this, check and see if you have one near you! It’s a store where Habitat for Humanity sells unused or gently used building supplies, furniture, light fixtures, etc. for a fraction of the price. I buy most of my paint and paint rollers there.

Let’s get started!

Step 1: Take all the drawers out. I also needed to add nails in a few places where trim was coming loose.

dresser1

Please forgive my shadowed garage picture

Step 2: Lightly sand the entire thing. This is important because it ensures that your paint will stick later on.

Step 3: The dresser was made out of particle board and the feet of the dresser were just past repair. Due to this, I just decided to cut them off! I measured each leg to make sure they would all be the same length and marked the line with a Sharpie. After that, I just cut all the ugly and damaged part off.

dresser2dresser

Step 4: Wipe off any dust or grime and paint your entire dresser. I used a paint roller and did two coats. Then, I let it dry overnight.

Step 5: Time to glaze! At first, the glaze seems kind of scary but, it’s actually very easy and gives really cool results. To glaze, I used a foam brush and did one side, or one drawer, at a time. Brush the glaze on, wait about 30 seconds, and wipe it off with a dry, clean rag until you get the desired look you want. If you want a darker glaze, let your glaze set for longer before wiping it off. If you want less glaze, use a damp rag instead. Make sure you skip your arm workout at the gym because this requires some muscle!

dresser15

When brushing on the glaze, it doesn’t have to be perfect. When you wipe it off, it will even out and cover any areas you might have missed.

dresser14

Here is the difference in color after adding glaze. Top: no glaze – Bottom: glazed

Step 6: Now that the entire dresser is glazed and painted, I needed to add the top. I cut the boards the same width as the top of the dresser and used wood glue and a few nails to hold it on. On the sides where I cut the board, I added a little bit of stain and it blended right in.

dresser16

Step 7: To finish it off, I added the new drawer pulls and it was all done! This was a quick and easy project that yielded big results!

dresser8 - Copydresser7 - Copydresser6 - Copy

dresser5


Categories: Uncategorized | Leave a comment

Make Your Own Headboard for under $50

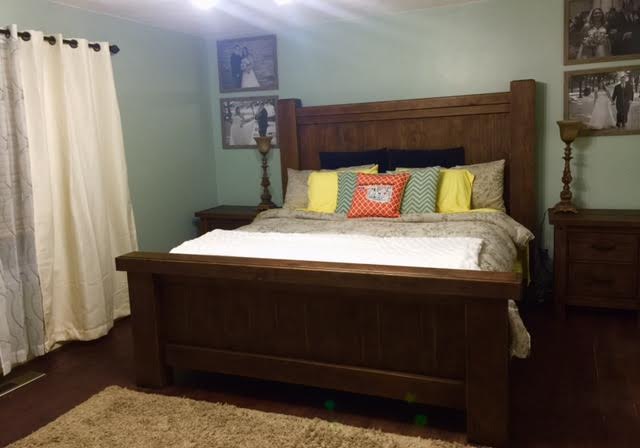
Well, I have finally decided it’s about time to convert the “junk room” into an actual bedroom. Since this room will serve as a guest room, I wanted the bed the look nice and comfy and be super impressive for our guests 🙂 I wanted to make a headboard that was neutral in color and can match almost anything as my mood and bedding choices change. For headboard inspiration, I began looking online at West Elm and Pottery Barn headboards. Here is what I found….

West Elm: $649                                    Pottery Barn: $749

img94craleigh-upholstered-nailhead-camelback-bed-headboard-o

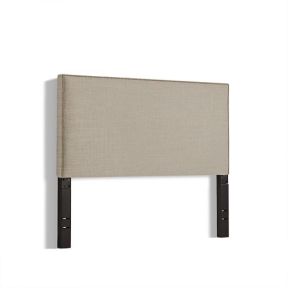
I wanted to create a headboard similar to those below but, for a fraction of the price. Here are the supplies I used:

Plywood ($10): I had Lowe’s cut my piece of plywood 60″w X 33″h. I was making this for a queen bed, so make sure you adjust your width for any other bed sizes.

2 – 2x4s: Cut these 25″ long. I already had these in my garage so they didn’t cost me anything. Always save leftover wood- you never know when it will come in handy!

1 Canvas Drop Cloth ($10): I got mine in the paint section at Lowe’s (ProLine Canvas Drop Cloth).

Mattress Topper: I had an old full size mattress topper from college that I no longer use. It’s been taking up space in my closet so I decided to clear up the space. However, you don’t have an old topper laying around, a twin sized topper from Walmart should work just fine. It doesn’t have to be fancy memory foam, just something to add a bit of padding.

Batting ($14): 2 1/2 yards of 15″ batting. I purchased mine from JoAnn’s and it was on sale. This is enough to do 2 layers of batting but, depending on the thickness of your foam, you could really get away with just one layer.

Nail head trim kit ($13): Although purchasing individual nail heads is cheaper, I recommend using a nail head trim kit to make the job quicker and easier. In this kit, the nail heads come in a 5 yard strip and you place a nail every 5 nail heads instead of nailing them all individually. This also helps create a straighter line since they are already all connected. I purchased my kit from JoAnn’s and use a 40% off coupon.

Staple gun

3″ screws

Hammer

Let’s get started!

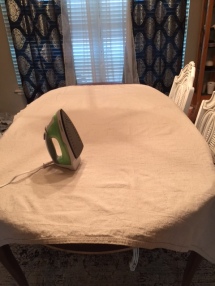
Step 1: First, wash and dry the drop cloth, cut it to size (you’ll want a few inches overlap) and iron it to get out as many wrinkles as possible. I guess the step of washing is optional but, the drop cloth smelled like a hardware store. I chose to use a drop cloth because it was much cheaper than buying several years of upholstery fabric.

IMG_2403

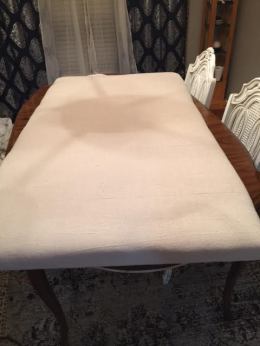
Step 2: Cut your batting the same size as the drop cloth; mine was 65″ X 35″. Place the batting on top of the drop cloth. My work space of choice was my dining room table. Just make sure you have a space to spread off the out to make your life easier.

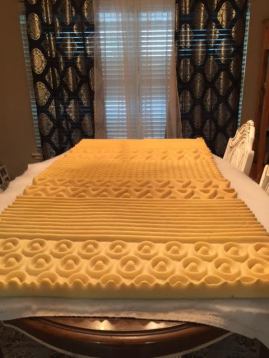
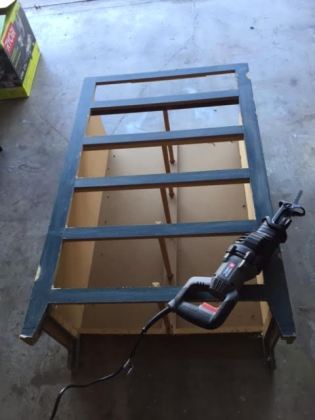
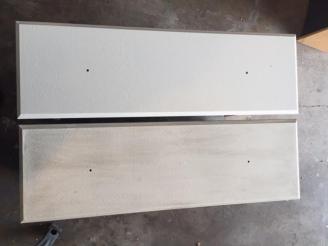
Step 3: Cut your foam to size. On the foam, you will not want any overlap but, cut it exactly the same size as the plywood (60″w X 33″h). Then, place the foam on top of the batting followed by the plywood sheet. So, to recap, you should have 4 layers – dropcloth, 2 layers of batting, foam and plywood.

(the plywood layer is missing from my photo below)

index

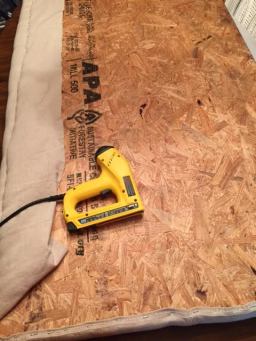
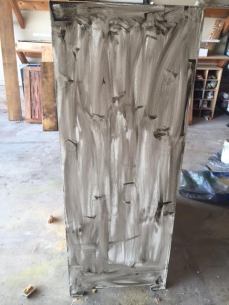
Step 4: Staple the batting and drop cloth to the back of the plywood. I recommend using an electric stapler. Consider it an investment – I use it all the time! I picked up my Stanley staple gun at Lowe’s for $30. After stapling, you should be able to turn headboard over and start seeing some progress!

index1index2

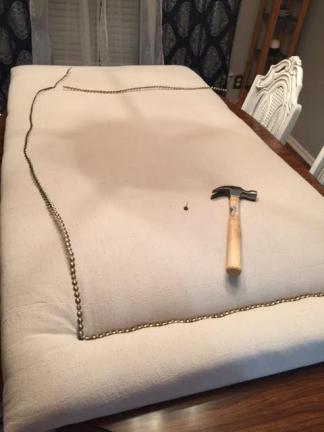
Step 5: It is time for the nail heads! First, lay out the trim and break off the pieces to your preferred length. I left placed my trim 5″ inside the edge of the headboard. YOu can really just place these to your personal preference or even place them around the edge of the headboard like the Pottery Barn example. Once you measure the length you want, you can just bend the space between the nail head trim to break it. A rubber mallet is the preferred tool of choice when hammering in nail heads so you do not scuff the nail heads. However, I didn’t have a rubber mallet so, just a regular hammer covered with a washcloth works just as well!

index3

Step 6: Screw the 2- 2x4s on the bottom sides of the bed. Be sure to drill holes in the 2x4s that correspond to your bed frame so you can bolt the headboard to your bed. I also chose to cover my 2x4s with the drop cloth because this will be visible.

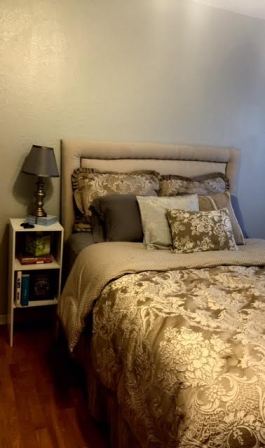
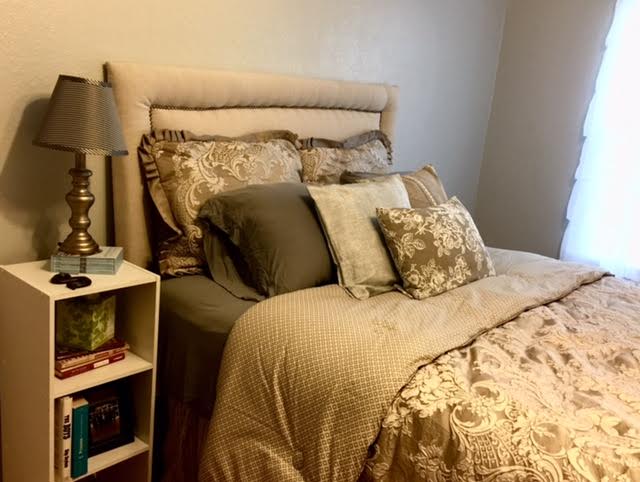
Step 7: Bolt your headboard to your bed frame and you’re all done!

index6index7

index5

Categories: Uncategorized | 1 Comment

Craigslist Buffet Makeover

I had a very empty dining room that I needed to fill and I didn’t want to spend a lot of money on a full dining set because…wowza! Have you looked at those prices? After a few weeks of scouring my local Craigslist site, I found a dining hutch, table and 6 chairs for a whopping $45!

Now, I knew this set needed A LOT of work so I wanted to tackle the hutch first.

Here is the list of items I used: 

  • CeCe Caldwell Vintage White Chalk paint (or your favorite brand) – $38
    •  I chose CeCe Caldwell because that was what was sold at my local boutique store I visited that day. Chalk paint is definitely more expensive but, since I had saved money on purchasing the buffet, I had a little wiggle room to splurge. Also, I HATE sanding and by using chalk paint, I was able to skip that chore.

0010_Simply-White-A

  • Valspar Signature Antiquing Glaze – $8
    • This is optional and based on personal preference. I used this to really make the scrolling on the buffet doors stand out but it’s not necessary.

042397578991lg

  • Minwax Polycrylic – $10
    • Make sure you use polycrylic and NOT polyurethane. Polyurethane will cause your piece to yellow over time, especially if you are using white paint.

027426244443lg

Let’s Get Started!

Step 1: Clean your buffet the best you can! This step is very important. This particular buffet had been collecting dust in a garage for quite a while. If you don’t clean your buffet, the dirt and grime will mix in with your paint and that won’t be pretty. Also take off all hardware such as knobs and pulls. I did not take off the door and hinges on this project. This buffet is not solid wood and I was afraid that if I took hinges out, it would difficult to screw back into particle board. However, if your piece is sold wood, you should not have to worry about this.

Step 2: If you are not using chalk paint, this is the part where you will need to lightly sand. However, if you are using chalk paint, you can skip that step completely! When you open the paint, you will see that it is VERY thick. Since I had a lot of space to cover, I mixed mine with a little bit of water to get a thinner consistency and stretch your paint to go farther.

Step 3: Start painting! Since chalk paint doesn’t give off a strong odor, it’s easy to do this project inside. Remember, chalk paint is meant to be “streaky” and show paint brush strokes. As it dries, it looks natural so, don’t panic! I gave this baby 2 coats and called it good – since the paint dries very quickly, this can be done in one night if you’re feeling extra ambitious.

I chose to paint the inside of my buffet a light blue with some old paint I found in my garage. I thought it gave it a nice contrast. I just used regular interior paint with no sanding and it went on beautifully.

IMG_2295

Painting the inside of your hutch a slightly different color with add interest to the piece. Have fun with your color and make it subtle or bold!

Step 4: If you are happy with your paint job, it is time to seal with polycrylic. If you are not happy with your paint job, try adding another coat. For this buffet, I did 3-4 coats of polycrylic because I knew this is something that would get heavy use in my home. Unlike chalk paint, polycrylic will stink up your home so it’s better to do this step outside or in your garage.

IMG_2275

Here is the bottom piece of the buffet after painting and sealing with polycrylic. At this point, I thought it looked good but, still a bit plain. I wanted the scrolling on the doors to stand out so, I experimented with Valspar antiquing glaze and was not disappointed! This brings me to step 5….

Step 5: To begin glazing, you will need 2 rags, (one dry, one wet), a small paint brush, and a few Q-tips if you have small detailed scrolling like I did.

Use the paint brush to brush on glaze in any corners or creases and let it set for about 20 seconds. After that, wipe off the glaze with your dry rag. If they dry rag doesn’t get everything off, use the wet rag to clean up. I recommend doing this in small areas at a time. Once you get more comfortable with the process, you will know how much you can do at one time. I used Q-tips to get in the small areas where I could not wipe the glaze off with the rag.

IMG_2284

I was already seeing a huge difference with the glazed panel on the right and the non-glazed panel on the left. It really made the details stand out.

Step 6: If you want, you can spray paint your knobs and pulls. I added a light coat of spray paint from some old paint in my garage but, most of the time, you can just wash handles and they are good as new.

Step 7: Stand back and admire your hard work!

IMG_2298


Categories: Uncategorized | Tags: , , , , , | 1 Comment

Create a free website or blog at WordPress.com.